
How to Throw a Cast & Landing Net for Fish: Step-by-Step Guide for Beginner
A cast net is one of the most useful tools for anglers who want to catch live bait quickly and efficiently. Whether you are targeting mullet, pilchards, shad, or other baitfish, learning the right throwing technique can help you spread the net fully, avoid tangles, and catch more bait with less effort.
This guide to throw casting net for fishing covers two practical approaches: a simple method for beginners using smaller nets and an advanced fanning technique designed for anglers seeking greater throwing distance.
You will also learn how to prepare your net, how nets are loaded, which throwing style suits you, select the right size, avoid common mistakes, and handle baitfish responsibly.
1. Understanding Cast Nets and Landing Nets
Before learning how to throw a cast net for beginners, it is important to understand that cast nets and landing nets serve different purposes.
A cast net is thrown over an area of water to capture multiple baitfish at once.
A landing net, by contrast, helps an angler bring an already-hooked fish safely out of the water.
Both matter, and understanding the types of fishing landing nets will make you a more complete angler
Types of Fishing Landing Nets
Landing nets come in several designs, each suited to different fishing situations:
-
- Knotted nylon nets: Made of woven nylon. They are inexpensive, but they can scrape slime and scales off a fish and scratch its skin and eyes. Hooks and lures also snag easily in them. And, knots can scrape fish, damage delicate scales, and snag hooks.
- Rubber-coated mesh nets: Softer on fish and generally less likely to catch hooks, fins, and gills.
- Fully rubberized nets: They are easy to clean and rarely snag fins, gills or hooks. They are also heavier, pricier and slower through the water.
- Long-handled landing nets: Useful when fishing from elevated shorelines or larger boats.
- Short-handled landing nets: Convenient for kayak fishing, wading, and fishing from small boats.
- Flat mesh nets: Knot-free and usually made with rubber-coated nylon. They cost more, but they are softer on fish, durable, and less likely to catch your hooks.
Cast Net vs Throw Net Difference
People often ask about the cast net vs throw net difference.
In everyday fishing talk, the two terms describe the same type of fishing net: a weighted circular net that you throw so it opens and sinks over bait.
The names vary by region, and some countries use their own traditional styles, such as the Brazilian tarrafa. What really changes from net to net is the size, mesh and weight, and those decide which throwing method works best
Both are designed to be thrown over baitfish, with weighted edges helping the net spread and sink. Terminology varies by region, but the basic purpose and operating principle are the same.
2. How to Choose a Cast Net Size
Choosing the right net size makes learning easier and improves your chances of getting a complete spread. Larger nets cover more water but usually require more strength, coordination, and practice.
Size is measured by the net’s radius, and a larger net covers more water but demands more strength and skill.
- 4-foot cast net: A manageable option for learning basic handling and coordination.
- 6-foot cast net: A useful middle ground for anglers who want more coverage without immediately handling a large net.
- 8-foot cast net: A versatile choice for catching bait in suitable shallow or moderately deep areas.
- 10-foot and larger nets: Better suited to experienced anglers who can control the additional weight and spread.
These sizes are general examples, not universal recommendations. Check how the manufacturer measures net radius or diameter before purchasing because sizing conventions can differ.
Best Cast Net Size for Beginners to Throw
For many beginners, a 4- to 6-foot net is a reasonable starting point. This range is manageable, quick to load and forgiving. A six-footer is a popular starting point because it covers a decent area without being heavy.
An 8-foot net can also work if you have sufficient strength and can practice safely in an open area.
Once your technique is consistent, you can move up to larger nets
The easiest cast net to throw for beginners is a lighter, smaller net with a manageable lead weight and a smooth, untangled hand line. And, the one that you can comfortably load, control, and spread without tangling the lead line or braille lines.
A mid-sized mullet or bait net is a sensible pick. Remember that a bigger net is not always better, and a net you can load quickly will catch more bait than one that wears you out
3. Step by Step to Throw Net a Fish Correctly
Many beginners search for how to throw net a fish correctly, when what they really need is the right landing technique. Scoop underneath the fish, head first, and lift it gently.
Never reach over the top or scoop from the side, because the fish will usually swim out or the lure will catch the mesh.
Sometimes you do not need a net at all. In a kayak or in shallow water, grabbing a small fish by hand is often faster and safer for the fish
The beginner-friendly technique works with appropriately sized nets, including many 4- to 8-foot models.
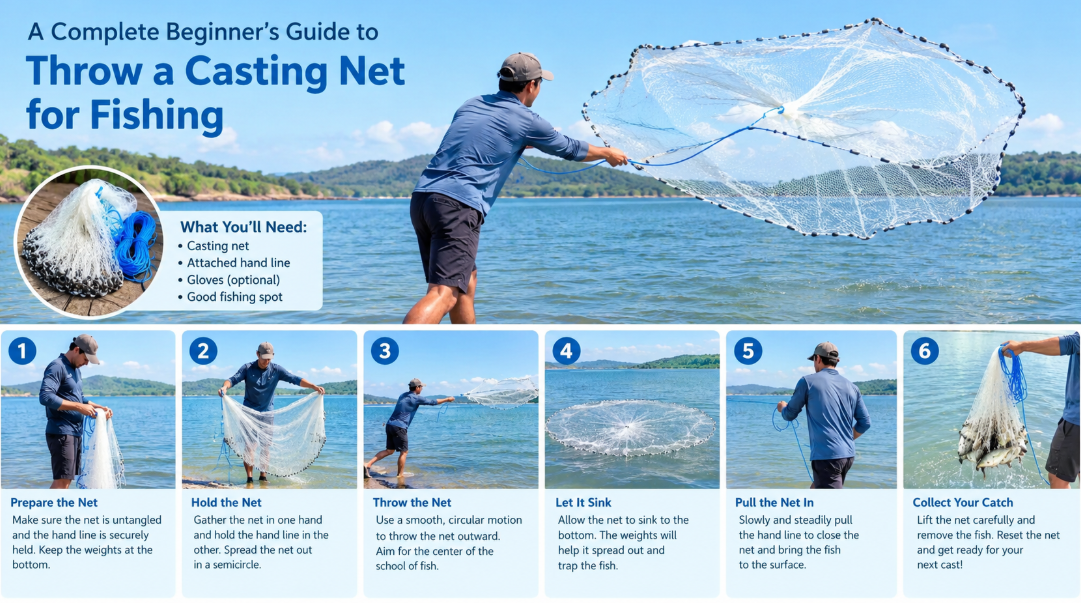
Step 1: Prepare the Hand Line
Begin by checking the throwing line for knots, twists, or damage. Arrange the rope into small, loose coils of approximately one foot each. Small coils are easier to control and less likely to tangle than large loops.
Keep the hand-line loop loose enough to release immediately. Never cinch a cast-net line tightly around your wrist. If the net catches on a boat motor or another object, a tight loop can cause serious injury or pull you into the water.
Step 2: Hold the Horn and Inspect the Net
The horn is the central upper section of the net. Hold it securely and inspect the mesh to make sure it is not twisted. Check that the weighted lead line is free from the braille lines and that no seaweed or debris is caught in the mesh.
Taking a few seconds to inspect the net helps prevent the incomplete spread that commonly frustrates beginners.
Step 3: Divide the Net into Two Sections
For the beginner method, distribute approximately half the net to each side. Hold the two sections evenly and identify the lead line connecting them. Doing a rolling one section over the other to create two distinct levels, then placing the connecting lead line over the thumb.
Keep the net organized as you do this. The objective is to create a controlled bundle that can open cleanly when released, rather than allowing the mesh to overlap randomly.
Step 4: Position the Net for Your Throw
Bring the net into a comfortable position around waist height for a shorter throw. For greater distance, the demonstrated method lowers the loaded net toward the knee or mid-thigh. This reduces the amount of net hanging loosely and allows the angler to step into the throw.
Keep your feet stable, your knees slightly bent, and your body balanced. Avoid throwing from a slippery surface or leaning too far over the water.
Step 5: Release the Net Smoothly
Make a coordinated forward throwing motion and release the net so the weighted edge can spread outward. Here, the right hand releases first while the left hand briefly controls the remaining section before releasing it.
Practice the timing slowly on dry land before attempting a full-power throw. The aim is a wide, even spread rather than maximum distance. A smaller, controlled spread is more useful than a powerful throw that leaves the net tangled.
Step 6: Allow the Net to Sink
After the net lands, allow the weighted edge to descend around the baitfish. Avoid immediately pulling the net back. Give it enough time to settle, taking water depth and the net’s sinking speed into account.
Step 7: Retrieve the Net Carefully
Pull the hand line steadily, gathering the net without allowing the weights or mesh to wrap around your hands. Once the net is close, lift it carefully and secure the captured baitfish. If you intend to use the bait alive, minimize handling and avoid exposing it to unnecessary heat or air.
4. How to Throw a Cast Net Without Tangling
If you want to know how to throw a cast net without tangling, start with small coils. Pull about a foot to a foot and a half of line at a time and make neat coils. Big coils tangle, while small ones rarely do.
Check that there are no knots in the rope and no twists in the net. A twisted net will not open properly and effectively shortens it
Tangles are among the most common beginner problems. They usually occur because the rope is poorly coiled, the lead line catches on the braille lines, or the mesh is twisted before the throw.
Use these practical habits to improve consistency:
- Make small, even coils in the hand line.
- Check the horn and mesh for twists before every throw.
- Separate the lead line from the braille lines.
- Remove weeds, sticks, and other debris from the net.
- Keep the sorting hand controlled instead of swinging the entire bundle repeatedly.
- Practice the loading sequence until the net can be prepared smoothly without rushing.
If the net repeatedly opens unevenly, stop and inspect how it is loaded. Do not compensate by throwing harder. Correcting the setup is usually more effective than adding force.

5. How to Throw a Cast Net by Yourself
You can learn how to throw a cast net by yourself by practicing the loading and release sequence on land before going fishing.
Start with a smaller net, an open area, and a clear view of the weighted edge. Rehearse the movements slowly until you can separate the sections without tangles.
Once the sequence becomes familiar, practice near shallow water where conditions are safe and the net can be retrieved easily. Avoid practicing near boat traffic, submerged obstacles, strong currents, or slippery banks.
Alternatively, you can practice on open grass until the load feels automatic, then move to the water, where speed matters when a school of bait passes
Easy Throw Cast Net Technique for Bait
For baitfish close to your feet, the waist-height loading method is convenient.
For bait farther away, the angler lowers the net toward the knee or mid-thigh before making a controlled throw. The second position helps reduce the amount of net that must be managed during the release.
Watch the water for visible baitfish, surface movement, or schools traveling through the area. Aim to cover the school without throwing blindly into vegetation, rocks, or other hazards.
Alternatively, this easy throw cast net technique for bait is built for speed:
- Loop the hand line loosely around your throwing hand.
- Make small coils of about one foot with the rope.
- Hold the horn and check for twists.
- Grab the net about a foot below the horn, which shortens a seven-foot net to roughly six feet.
- Make sure the lead line is clear, then split the lead line 50/50 between your left and right hands.
- Roll the left half over so there are two levels of net, then place the connecting lead line over your thumb.
- Grab the lead line at the bottom and throw with your right hand, releasing the left hand a second later.
Short Throw vs Long Throw
Where you grab the net sets your range.
Grab near your hip and the net opens close, around your feet, which is ideal when bait is nearby.
Grab lower, between knee and hip, and you have less net to manage and can step into the throw to reach bait ten to fifteen feet away.
6. Advanced Fanning Technique for Greater Distance
Later on, you can try an advanced fanning method using an 8-foot cast net. Unlike a basic two-section throw, this technique carefully arranges different parts of the weighted edge so they travel in different directions during release.
Prepare the Net in Stages
- Arrange the hand line in small coils and check the entire net for twists.
- Fan out the weighted edge so you can identify the different sections.
- Gather the net in controlled stages, keeping the mesh flat rather than allowing it to overlap.
- Load most of the net into the throwing hand while keeping a smaller section arranged for the opposite side of the spread.
- Remove kinks from the braille lines as you load, keeping the sorting hand controlled.
- Stand with your feet about shoulder-width apart and maintain a balanced athletic stance.
- Bring the net back, rotate your hips, and move through the throw in one coordinated motion.
- Release the sections in the demonstrated sequence so the net fans outward.
At this point, the movement is as similar to a baseball backhand. The technique relies on coordinated body movement and careful net arrangement, rather than simply spinning the net as hard as possible.
This method takes practice and may not be the easiest choice for a new angler. Learn the basic throw first, then work on advanced loading and release timing as your control improves.
7. How to Throw a Cast Net from a Boat
Learning how to use a cast net from a boat requires extra attention to balance, line management, and nearby equipment.
Choose a stable position with enough room to load and release the net without striking another person.
- Keep the throwing area clear of rods, hooks, ropes, and loose equipment.
- Stay away from the propeller and trolling motor.
- Never secure the hand line tightly around your wrist or body.
- Use a short, controlled throw until you understand how the net behaves from the boat.
- Check local regulations regarding cast nets, baitfish species, and permitted fishing areas.
A smaller net is often easier to manage in a kayak or compact boat.
A larger net can cover more water but requires additional space and careful control.
8. Special Techniques and Common Questions
How to Open an 8ft Cast Net Fully
To improve the spread of an 8-foot cast net, ensure that the lead line is free of tangles and that the mesh lies flat during loading.
Divide the net evenly for the beginner method or follow the staged loading sequence for the advanced fanning method. Practice the release timing before increasing throwing power.
In order to open a 8ft cast net fully with this style, build the load carefully:
- Make small coils, then place the horn into your hand.
- Fan the weights out and check for tangles.
- Pull the net in at arm’s length, pinching and drawing the leads so those closer to you sit higher. These leads fan out farther when the net rotates.
- Grab roughly 90 percent of the net, leaving about 10 percent hanging, and load it over your shoulder while sorting out any kinks.
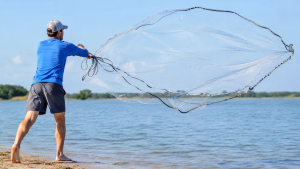
- Stand with your feet shoulder-width apart, lean back, and swing like a backhand baseball hit, driving with your hips.
Do not expect the net to spin. Each lead has its own job, and the net opens on its own when released, with no resistance from your hand.
How to Throw a 10 Ft Cast Net in Deep Water
For how to throw a 10 ft cast net deep water, the principles scale up. When practicing to throw ten- to fourteen-foot nets, treat the fan technique as the foundation: lower load, strong hips and a clean release. Larger nets are heavier, so build skill on smaller sizes first and give your net time to sink in deeper water before retrieving it
A 10-foot cast net is heavier and more demanding than a smaller net, and deep water adds retrieval challenges.
Confirm the net’s actual dimensions and sinking characteristics, assess the current and depth, and allow enough time for the lead line to sink before retrieving it. Do not assume a large net is suitable for every depth or baitfish species.
Some larger nets can be said as a subject for future instruction but beginners should build their technique with a smaller net first.
How to Throw a Cast Net with a Ring
Ring-style cast nets can use a different loading and release sequence from traditional hand-loaded nets. Follow the manufacturer’s instructions for your specific design.
Check that the ring, mesh, and line are properly arranged, and practice with a controlled release before fishing.
The loop acts as your ring: keep it loose, coil the line cleanly, and make sure it runs free when the net leaves your hand.
How to Fold a Cast Net Neatly
After retrieving the net, remove bait, weeds, and debris.
Rinse it as appropriate for the material, separate the weighted edge from the braille lines, and lay the mesh flat.
Organize the net into manageable sections and coil the hand line separately.
Store it according to the manufacturer’s instructions to prevent tangles, mildew, and damage.
Learning how to fold a cast net is really about loading it in an orderly way.
Hold the horn, then slide your hand down about a foot to grab the net. Make sure the lead line is clear and not caught in the braille lines, and fan the weights out so nothing is crossed. A neat fold means a clean opening
9. Common Cast Net Mistakes to Avoid
- Using a tangled net: Twisted mesh and trapped lead lines can prevent a complete spread.
- Making oversized rope coils: Large loops can cross and snag during the throw.
- Choosing a net that is too large: Excessive weight can make loading and release difficult.
- Throwing too hard: Power cannot compensate for incorrect loading or poor timing.
- Ignoring safety: Tight wrist loops and nearby motors create serious entanglement risks.
- Retrieving too quickly: Pulling before the net settles may allow baitfish to escape.
- Neglecting fish welfare: Handle baitfish gently and return unwanted catch promptly when regulations permit.
Frequently Asked Questions
What is the easiest cast net to throw for beginners?
A 4- to 6-foot cast net is a practical starting point for many beginners because it is generally easier to handle than a larger net. Choose a size that matches your strength, experience, and fishing conditions.
Can I throw a cast net without putting it over my shoulder?
Yes. The beginner method described here uses controlled hand loading and a two-section arrangement without placing the net over the shoulder or in the mouth.
Why does my cast net fail to open fully?
Common causes include twisted mesh, tangled braille lines, uneven loading, incorrect release timing, and a net that is too heavy for your current technique.
Should I use a cast net or a landing net?
Use a cast net when regulations permit and you want to catch baitfish. Use a landing net to bring a hooked fish safely out of the water. They are designed for different purposes.
Can I use a cast net from a kayak?
Yes, where legal, but balance and line safety are essential. Use a manageable net, keep the throwing area clear, and avoid tight wrist loops or any setup that could entangle you.
How can I make my cast net last longer?
Inspect the mesh, lead line, hand line, and braille lines regularly. Remove debris, rinse and dry the net appropriately, and store it in an organized way to reduce tangles and wear.
Why does my cast net not open?
Usually because of twists, big coils or tangled lead lines. Recheck the net before each throw.
Should I tie the hand line tightly to my wrist?
No. Keep it loose to avoid being pulled into motors or the water.
Is a cast net the same as a landing net?
No. A cast net catches bait, while a landing net helps bring a hooked fish aboard.
Can I practice on land?
Yes. Open grass is the best place to build your loading and release rhythm.
Conclusion: Master the Basics Before Throwing Farther
Learning to throw a cast net effectively comes down to preparation, controlled loading, good timing, and safe retrieval. Start with a manageable net, make small rope coils, remove every twist, and practice spreading the net before attempting long-distance throws.
As your confidence grows, experiment with the advanced fanning technique to improve coverage and distance. Whether you fish from shore or a boat, a properly loaded net can help you collect live bait efficiently while reducing frustration and unnecessary harm to fish.
Key Takeaways
-
- Start with a manageable 4- to 6-foot net if you are new to cast netting.
- Keep the hand line loose for safety and never tie or cinch it around your wrist.
- Inspect the lead line, braille lines, and mesh before every throw.
- Use controlled loading and smooth release timing instead of relying on force.
- Practice basic throws before progressing to larger nets and advanced techniques.
- Follow local fishing regulations and handle captured baitfish responsibly.
- Use small coils and check for twists to avoid tangles.
- Grab higher for short throws and lower for long throws.
- Handle landing nets and released fish gently.
Cast net throwing is a skill built from small, correct habits: clean coils, a twist-free net, a careful load and a relaxed release.
For beginners, always start with a smaller net, master the simple hip load, and add the fan throw when you want more distance
