Easy Step-by-Step to Spool Braided Line to Spinning Reel for Newbie
Learning how to add line to a spinning reel for beginner anglers is one of the most important fishing skills to master. Incorrect spooling can cause frustrating line twists, wind knots, tangled loops, poor casting distance, and even lost fish.
Fortunately, you can avoid most of these problems by choosing the right fishing line, attaching it securely, and winding it onto the spool with consistent tension.
Whether you are using monofilament, fluorocarbon, or braided line, the basic process is straightforward once you understand how a spinning reel handles fishing line.
This guide explains how to spool a spinning reel step by step, minimize line twist, select the appropriate line type, and troubleshoot common problems so you can spend less time fixing tangles and more time catching fish.
1. Choose the Right Type of Fishing Line
Before learning how to put new line on a spinning reel, consider your fishing conditions, target species, and preferred techniques.
Understanding each type of fishing line and how to use it helps you make a better choice before filling your spool.
a. Monofilament Line
Mono is a single strand of stretched nylon, and it can stretch up to 25% before it breaks. That stretch absorbs head shakes and hard hook sets, and mono sinks slowly, so it suits topwater lures. It is the best choice for beginners, treble-hook baits, and anyone on a budget.
The trade-off is that nylon absorbs water and degrades in sunlight, so replace it every couple of seasons.It stretches under pressure, helping absorb sudden runs and head shakes. Because it is relatively buoyant, it also works well with topwater lures and many treble-hook presentations.
However, mono can develop memory, absorb some water, and deteriorate with prolonged sunlight exposure. Replace it when it becomes rough, brittle, badly coiled, or damaged.
b. Copolymer Line
Copolymer combines two or more nylon materials into one strand. Depending on the formulation, it can offer less stretch, better abrasion resistance, or a smaller diameter than comparable monofilament. It is worth considering when you want familiar mono handling with improved sensitivity.
Moreover, it looks like mono but resists scrapes, and is thinner for the same strength. It is a good step up for jigs and plastics.
c. Fluorocarbon Line
Fluorocarbon is relatively difficult to see underwater, sinks more readily than mono, and offers useful abrasion resistance around rocks, docks, and other obstacles. It is popular for clear-water fishing, jigs, and soft-plastic lures.
Fluorocarbon bends light almost like water does, so it nearly disappears underwater. It sinks, resists abrasion, and works well in clear water for line-shy fish. It is stiff, though, and can jump off a spinning reel. Always wet your knots before cinching them
Its stiffness can create coils and loops on spinning reels, particularly when the line is too heavy for the reel. Wet knots before tightening them, and check the manufacturer’s recommendations when choosing fluorocarbon as a main line.
d. Braided Line
Braid is made from woven high-strength synthetic fibers. It has very little stretch, offers excellent sensitivity, and provides substantial breaking strength for its diameter. These characteristics make it useful for long casts, heavy vegetation, and techniques that require immediate contact with a lure.
Braid weaves 4, 8, or 12 strands of polyethylene fiber into one line. It stretches under 5%, floats, and cuts through weeds. A 30 lb braid is about as thin as 8 lb mono. Most anglers add a fluorocarbon leader because fish can see braid.
Braid can slip on a smooth spool if it is installed without suitable backing or another secure attachment method. Its limp construction can also contribute to wind knots when the spool is overfilled or the line is wound loosely.
e. Fused Line
Fused line bonds braid fibers with heat so it lies flatter on light spinning gear rather than the traditional woven construction of braid. It is generally stiffer than conventional braid and can be easier to manage for certain spinning applications. However, its coating may wear with use, so inspect it regularly.
f. Lead-Core Line
Lead-core line contains a lead center surrounded by a braided sheath which is for trolling to set depth. Its weight helps anglers control trolling depth, and its changing color sections can help estimate how much line has been deployed. It is intended primarily for trolling rather than ordinary spinning-reel casting.
g. Wire Line
Wire line, typically stainless steel or titanium, is useful when targeting fish with sharp teeth, including pike and certain saltwater predators. Steel is economical but can kink permanently, while titanium generally returns to its original shape more readily. Wire is commonly used as a short leader rather than as the main line on a typical spinning reel.
h. Fly Line
Fly line is a thick, weighted line designed to load a fly rod during casting. Floating, sinking, and sink-tip versions allow anglers to present flies at different depths. It must be matched to an appropriate fly rod and reel, so it is not a substitute for ordinary spinning-reel line.
Beginner recommendation: Start with monofilament if you want an affordable, forgiving option. When you are ready for greater sensitivity and a thinner main line, consider braided line paired with a suitable fluorocarbon leader.
2. What You Need to Spool a Spinning Reel
Gather your equipment before starting. Having everything ready makes the process easier and helps prevent loose line from tangling.
- A spinning reel attached to its fishing rod.
- A compatible spool of fishing line.
- Scissors or fishing-line cutters.
- A clean cloth to protect your fingers when applying tension.
- Electrical tape or monofilament backing if needed for braid.
- A line spooling station or winder, if available.
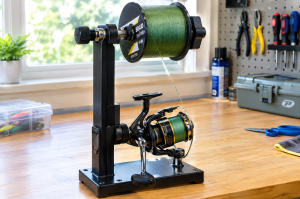
A dedicated spooling tool is helpful but not essential. You can learn how to put line on a spinning reel without a spooler using a simple setup at home, provided you control line tension and pay attention to how the line comes off the supply spool.
3. How to Add Line to a Spinning Reel for Beginners: Step by Step
Step 1: Check the Reel and Remove Old Line
Inspect your reel for damaged guides, a rough line roller, or other problems that could affect performance. If the existing line is worn or badly twisted, remove it before installing fresh line.
A line stripper can make this job faster, particularly if you maintain several reels. Otherwise, unwind the old line carefully and dispose of it responsibly rather than leaving it where wildlife can become entangled.
Step 2: Feed the Line Through the Rod Guides
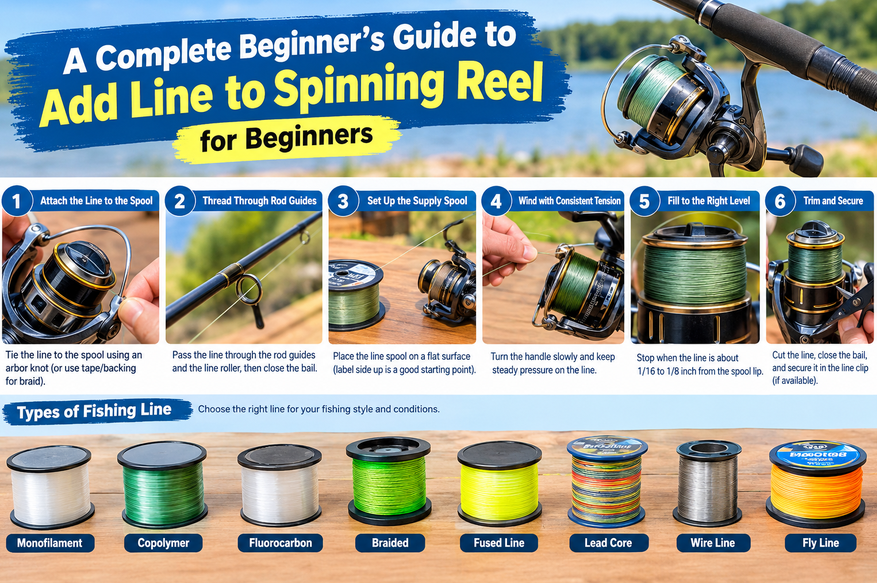
Pass the new line through the first guide or through all the guides, depending on your preferred setup. Make sure the line follows the correct path toward the reel. Open the bail before tying the line to the spool, and confirm that the line is positioned correctly around the line roller when you close it.
Step 3: Tie the Line to the Spool
For monofilament and fluorocarbon, an arbor knot is a straightforward option. Wrap the line around the spool, tie an overhand knot around the standing line, and add a second overhand knot to help prevent the tag end from slipping. Pull the knot snug and trim the excess.
When learning how to tie braid to spinning reel spool, remember that braid can slip against a smooth metal spool. You can use a small piece of electrical tape over the initial attachment or add a few wraps of monofilament backing. Alternatively, use a secure knot and backing method recommended by your reel manufacturer.
Some anglers spool braid directly onto a spool with a suitable gripping surface, but tape or backing is a useful precaution when slippage is possible. Do not rely on a strong drag setting to compensate for line spinning freely around the spool.
Step 4: Position the Supply Spool Correctly
Place the supply spool on a flat surface with its label facing upward as a starting point for many conventional spooling setups. Begin winding slowly and watch how the line leaves the supply spool. If the line starts forming coils or twisting excessively, stop and change the orientation.
Or you can place the spool so line comes off in the same direction it goes onto the reel. For many spools that means the line peels off counter-clockwise. Doing it backwards creates extra twist and bird’s nests.
There is no single label-side rule that eliminates every twist. The relationship between the supply spool’s size, its rotation, and the spinning reel’s rotating bail affects the result. A dedicated line-spooling device that rotates the supply spool in coordination with the reel can help minimize unwanted twist.
Step 5: Apply Consistent Tension
Close the bail and begin turning the handle slowly. Pinch the line gently between your fingers or use a soft cloth to apply steady pressure. Keep your hands clear of moving reel parts, and avoid squeezing the line so tightly that it causes friction burns or damages the line.
Consistent tension is particularly important when learning how to spool braided line on a spinning reel no loops and twists. Braid should sit firmly and evenly on the spool. Loose sections can bury themselves beneath other wraps, while uneven winding can lead to tangles during casting.
Step 6: Fill the Spool Without Overfilling
Continue winding until the line reaches the reel manufacturer’s recommended fill level. A common starting point is to leave approximately 1/16 to 1/8 inch of space between the line and the spool’s outer lip, although the correct amount varies by reel design.
Overfilling can cause coils to spring off the spool and create tangles. Underfilling, on the other hand, can reduce casting distance. Stop before the line reaches the lip, cut it cleanly, and secure it in the reel’s line clip if one is provided.
4. How to Spool a Spinning Reel Without Line Twist
Understanding line twist is essential. Line twist is unavoidable on a spinning reel, because the bail winds line onto the spool in a twisting motion.
On a baitcasting reel the spool turns and the line goes on straight. On a spinning reel the line comes off the spool in loose coils. The goal is not zero twist. The goal is to have the twist in the right place. You want it in the line when it is cast out. When you reel in, the line untwists and lies flat on the spool.
The common “label side up or down” advice helps, but it only works perfectly if your reel spool and the supply spool are exactly the same size. A larger supply spool means the reel turns about two times to pull off one coil, which adds twist you do not want. That unwanted twist causes wind knots, tangles, and shorter casts.
4a. Use a Dedicated Line Spooler
A quality line-spooling device can hold the supply spool and control its rotation while you wind line onto the reel. Some systems allow the reel spool to be mounted on a rotating shaft, which helps transfer line without the usual twisting action.
If you frequently replace line or maintain multiple fishing rods, this equipment can save time and improve consistency. A local tackle shop may also offer a professional spooling service.
4b. Check the Supply Spool During Winding
If you are spooling without a dedicated tool, pause after several handle turns and inspect the line. Let a short section hang loosely between the rod tip and the supply spool. If it coils tightly or twists repeatedly, stop and correct the supply spool’s orientation before continuing.
This is the practical foundation of how to spool a spinning reel with line twist prevention: use steady tension, monitor the line as it comes off the supply spool, and correct problems before filling the entire reel.
Here is a quick checklist for how to spool a spinning reel with line twist prevention:
- Use a tackle shop spooler or a spooling station when possible.
- Orient the supply spool so line leaves in the same direction it enters your reel.
- Keep steady tension, and reel slowly.
- Spray a line conditioner on a cloth as the line goes on. This reduces memory and helps it come off the spool smoothly.
- Never overfill the spool.
4c. Reduce Line Memory
Line memory causes fishing line to retain the coils formed while stored on a spool. For compatible nylon or fluorocarbon lines, some anglers use a brief warm-water treatment or a fishing-line conditioner to help manage coils. Follow the line manufacturer’s instructions and avoid hot water or chemicals that could damage the line.
These treatments do not eliminate twist introduced by the reel mechanism. They are best considered additional measures for reducing memory rather than substitutes for correct spooling.
5. How to Spool Braided Line on a Spinning Reel
Braid requires particular attention because it is thin, limp, and often slippery. If you want to know how to put braid on a spinning reel, follow the same basic steps as for other line types but focus on spool grip, tension, and fill level.
- Attach the braid securely using tape, backing, or a suitable spool connection.
- Close the bail after the line is correctly routed.
- Apply consistent pressure while slowly turning the handle.
- Keep the braid winding tightly and evenly across the spool.
- Stop at the recommended fill level rather than adding extra line.
- Check for loose wraps before attaching your leader or lure.
For many setups, braid with a fluorocarbon leader offers a practical combination of sensitivity, casting performance, and reduced visibility near the lure. Choose line strength and leader length according to your target species, cover, and fishing technique.
Alternatively, you can use the same arbor knot. Because braid is so slippery, many anglers add a short piece of electrical tape over the line on the spool. This gives it something to grab. Without it, the line can spin around the spool when you set the hook, and your drag will not engage. Some people think their reel is broken when it is really braid slip. Other experienced anglers skip both tape and mono backing and never have problems, but tape is cheap insurance
The Tension Rule for Braid
This is where wind knots start. They are not the braid’s fault. They come from loose spooling. When learning how to put braid on a spinning reel, pinch the line with your off hand and apply firm pressure. A paper towel protects your fingers. Reel slowly and steadily. Squeeze the line when you are done: if the spool feels firm and not squishy, you did it right.
Seat the Braid After Spooling
Cast a heavy lure a few times before you tie on your fishing lure. The water pressure tightens the spool. On a boat, let out 100 to 150 yards behind you and reel it in, which lets the wake add tension.
6. How to Spool a Spinning Reel With Mono
Monofilament is often the easiest line for beginners to install. To learn how to spool a spinning reel with mono, tie the line to the spool with an arbor knot, position the supply spool, and wind slowly while maintaining moderate tension.
Check for coils as you go. If the line springs off the supply spool in tight loops, pause and adjust its orientation. Because mono stretches more than braid, avoid applying excessive force while winding. Fill the spool to the recommended level and inspect the finished line for loose wraps.
The same general approach works for fluorocarbon, although its stiffness may require extra attention to supply-spool orientation and fill level.
Mono grips the spool well because it is grippy and stretchy, so tape is optional. It also has more memory than braid, so spool slowly and keep tension steady. If the line has been sitting a long time, warm it up first
7. How to Fix Uneven Line Lay on a Spinning Reel
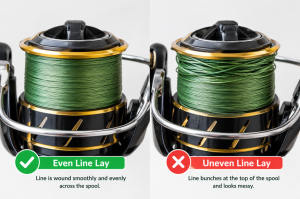
Uneven line lay occurs when the line builds up more heavily at the top or bottom of the spool. This can reduce casting performance and increase the likelihood of wind knots. On many spinning reels, small adjustment washers on the spool spindle control the spool’s position.
Alternatively, learning how to fix uneven line lay on a spinning reel is simple. The spool moves up and down as you reel, and if its position is slightly off, line piles up on one side.
If line bunches at the top or bottom of the spool, you will see casting problems and more wind knots. So, just follow this procedure to fix it
- Strip all the old line off the spool.
- Loosen the drag knob counter-clockwise and remove it.
- Slide the spool off to reach the spindle and its small adjustment washers.
- If line bunches at the top, add washers to raise the spool. If it bunches at the bottom, remove washers.
- Reinstall the spool and drag, then spool fresh line.
7a. Correct Line Buildup at the Top
If the line consistently bunches near the top of the spool, adding a washer can raise the spool. First remove the line, loosen the drag knob, and lift the spool off the spindle. Add a suitable adjustment washer, reinstall the spool, and check the winding pattern.
7b. Correct Line Buildup at the Bottom
If the line accumulates near the bottom, remove a washer to lower the spool, following the reel manufacturer’s instructions. Washer arrangements vary, so do not assume every reel uses the same adjustment system.
After making a change, wind on fresh line and check the result. If the line lay remains uneven, inspect the reel for damaged components or consult a qualified technician before making further adjustments.
Maintenance: Keep Your Line Fresh
- Respool often. Depending on use, that could be once a season or several times a year. It is one of the best ways to prevent twist and knots.
- Use a line stripper. A line remover takes old line off in seconds, which is handy if you maintain many reels.
- Condition your line. A spray conditioner helps remove memory before a trip.
8. Common Spooling Mistakes to Avoid
- Winding too loosely: Loose line can sink into lower wraps and cause tangles, especially with braid.
- Overfilling the spool: Too much line can spill off the lip during casting.
- Ignoring line twist: Watch for coils and correct the supply spool’s orientation early.
- Attaching braid to a slippery spool without protection: Use appropriate tape or backing when needed.
- Using damaged line: Replace line that is frayed, brittle, or badly abraded.
- Forgetting reel maintenance: Check the line roller, spool, guides, and drag system regularly.
FAQs About Spooling a Spinning Reel
Can I spool a spinning reel by myself?
Yes. To learn how to spool a spinning reel by yourself, secure the rod, position the supply spool so the line feeds smoothly, and apply steady tension as you wind. A line-spooling tool makes the process easier but is optional.
Since you do not need a helper to hold the spool, just keep reeling slowly with tension. If the spool spins in the water, that is the line shedding twist, and it is doing its job. Do it over a sink or outside, because it gets splashy
How do I put line on a spinning reel without a spooler?
Place the supply spool on a flat surface, thread the line through a rod guide, tie it securely to the reel spool, and wind slowly under tension. Pause frequently to check for coils, twists, and loose wraps.
No spooling station? You can still learn how to put line on a spinning reel without a spooler. Two simple tricks help:
- The pencil or garage floor method: Slide a pencil through the supply spool and have someone hold it, or let the spool lie flat so the line comes off straight and does not coil.
- The warm water bowl: Drop the supply spool into a bowl of warm water. It can roll, float, and flip as needed, so you do not worry about direction. The warm water also relaxes coils and memory.
Should the line spool face up or down?
Label-side up is a useful starting point, but it is not a universal solution. The correct orientation depends on how the line comes off the supply spool and how the reel winds it. Check for twisting while winding and adjust when necessary.
Do I need monofilament backing for braided line?
Not always, but backing can prevent braid from slipping on a smooth spool and may reduce the amount of braid required. Suitable electrical tape can also provide grip when installed correctly.
Why does my line keep forming loops after spooling?
Common causes include excessive spool fill, loose winding, line memory, and unwanted twist. Remove damaged line, correct the fill level, and respool under consistent tension.
How often should I replace fishing line?
Replacement depends on how often you fish, the type of line, storage conditions, and visible wear. Inspect line before each trip and replace it when it becomes damaged or unreliable rather than relying only on a fixed schedule.
How much line should I put on a spinning reel?
Fill the spool until it is about an eighth to a sixteenth of an inch below the lip. Many spools also have a line marking showing where to stop.
Do I need mono backing under braid?
Not necessarily. Some anglers never use it, while others add electrical tape or mono backing to stop braid from slipping. Either approach works if the line is spooled tightly.
Which direction should line come off the spool?
It should come off in the same direction it goes onto the reel, often counter-clockwise. If your line is still twisting, use a spooling device instead of relying on spool direction alone.
Why does my braid get wind knots?
Usually because it was spooled loosely or overfilled. Spool under firm tension, stop before the lip, and cast a heavy lure a few times to set the line.
What is the best line for a beginner?
Monofilament. It is cheap, forgiving, and easy to handle. Move to braid with a fluorocarbon leader when you want more sensitivity and distance.
Conclusion: Get Your Spinning Reel Ready for Fishing
Learning how to add line to a spinning reel for beginner anglers is easier when you understand the relationship between line type, spool orientation, winding tension, and fill level. Start with a suitable line, secure it correctly, wind slowly, and check the line throughout the process.
For beginners, monofilament offers simple handling and good value. For anglers who need greater sensitivity, braid paired with a suitable leader can be an excellent upgrade. If you experience persistent line twists, loose loops, or uneven line lay, troubleshoot the underlying cause instead of simply adding more line.
Spooling a spinning reel is easy once you understand that line twist is part of how the reel works. Choose the right line, keep tension steady, avoid overfilling, and use a spooler when you can. With these habits you will cast farther, tangle less, and lose fewer fish to bad line.
Key Takeaways
-
- Choose fishing line that suits your target species and fishing conditions.
- Secure braid against spool slippage with suitable backing or tape when necessary.
- Maintain consistent tension and avoid overfilling the spool.
- Monitor the supply spool and correct unwanted twisting while winding.
- Adjust spool washers only when appropriate for your reel design and for fixing uneven line lay.
- Inspect and maintain your line and reel regularly for dependable performance.
- Start with mono if you are a beginner; upgrade to braid with a fluorocarbon leader later.
- Line twist is normal in spinning reels. The goal is flat line on the spool.
- A spooling station or tackle shop spooler is the most reliable fix for twist.
- Keep firm tension while reeling, especially with braid.
- Use tape or backing to stop braid slip if needed.
- Fill to within an eighth to a sixteenth of an inch of the lip.
- Respool regularly and condition your line.
With a little practice, you can spool your spinning reel confidently, improve casting consistency, and spend more time fishing instead of untangling line.
