Solution to Spool a Spinning Reel without Wind Knots & Fix Uneven Line Lay
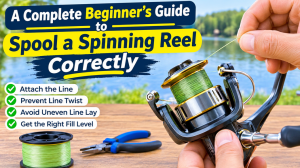
Knowing how to spool a spinning reel correctly can make a huge difference in your fishing experience. Poorly spooled fishing line can cause frustrating problems, including line twists, wind knots, bird’s nests, reduced casting distance, and even lost fish. Fortunately, getting your spinning reel ready doesn’t require expensive equipment or professional help.
Whether you’re using braided line or monofilament, the secret is understanding line direction, maintaining consistent tension, and filling your spool to the correct level. You also need to check your reel’s line lay before installing fresh fishing line because incorrect spool positioning can create problems even when your spooling technique is perfect.
In this beginner-friendly guide, we’ll explain the right way to spool a spinning reel, how to prevent common mistakes, and how to correct uneven line distribution. Let’s get your reel ready for smoother casting and better fishing performance.
1. Prepare Your Spinning Reel and The Line Before Spooling
Before installing new fishing line, inspect your spinning reel carefully. Remove old, damaged line and check the spool for dirt, scratches, or other damage that could affect line performance.
Check the Spool and Line Capacity
Look at the information printed on your reel’s spool. Most manufacturers provide recommended line capacities based on different line diameters. Choosing an appropriate line size helps prevent unnecessary bulk and improves casting performance.
For general bass and bluegill fishing, you can use 15-pound braided line or 8-pound monofilament. However, your ideal line depends on your target species, fishing conditions, rod, and reel specifications.
Before you strip the old line, look at how it sits on the spool. If you want to understand why a spinning reel line lays uneven, this is where to start. Line piled high at the top or fat at the bottom signals a spool-height problem, which you will fix in the washer section below. Do this before the new line goes on, or you will spool twice.
Check Your Spool’s Surface
Pay attention to the surface of your spinning reel spool, especially if you’re planning to use braided fishing line.
- Smooth spool: Usually requires monofilament backing because braid can slip around the spool arbor.
- Braid-ready spool: Grooves or a rubber strip provide additional grip, allowing braid to attach directly when using an appropriate knot.
Understanding this difference helps you choose the correct connection method before adding new line.
Optional Prep That Pays Off
- Warm the line spool: One angler soaks the filler spool in hot water to reduce line memory so the line lies flatter on the reel.
- Polish the spool lip: A tiny dab of car polish on a clean rag smooths the lip of the reel spool for less friction on the cast.
- Condition the line: Spraying line conditioner on a microfiber cloth and running the line through it as you spool helps cut memory and twist.
2. How to Attach Fishing Line to a Spinning Reel
One common mistake anglers make is forgetting to open the bail before attaching the fishing line. This small detail can create unnecessary problems during the spooling process.
Step 1: Thread the Guides and Flip the Bail
Flip the bail arm into its open position before attaching your line. This allows you to position the line correctly and ensures it can pass underneath the bail assembly and around the line roller when you begin winding.
On the other hand, run the line through the first rod guide before anything else, because it is easy to forget. Then open the bail. Skip this and the line will not wrap properly, and the wraps end up on the wrong side of the roller. If you tie on and forget, back the drag off, remove the spool, flip the bail, and slide the spool back on.
Step 2: Thread the Line Through the Rod Guides
Feed your fishing line through the first rod guide closest to the reel. You can thread it through all the guides if you have enough room, but using the first guide is sufficient for the basic spooling process.
Step 3: Tie the Line to the Spool
For monofilament, a simple arbor-style connection can secure the line to the spool. Wrap the line around the spool and tie an overhand knot around the main line before tightening it.
For braided line, the connection requires additional attention because braid can slip on a smooth spool.
If you accidentally forget to open the bail before attaching your line, remove the drag knob and spool, flip the bail into the correct position, and reinstall the spool.
3. How to Spool Reel with Braid or Mono Lines
Braided line and monofilament behave differently during installation. Understanding these differences is essential for achieving consistent tension and preventing line problems.
How to Spool Braided Line
Braided fishing line has very little stretch and can slip around a smooth spool. Therefore, you need either a braid-ready spool or a suitable monofilament backing.
If your spool has grooves or a rubber strip, it is braid ready. The best answer to how to spool braided line on spinning reel so it doesn’t slip is a union-style knot. Make a loop, wrap the tag five or six times around both lines, and cinch it. Open the bail, wrap the loop around the spool four or five times, and pull the main line tight. The wraps grip each other and the spool, so there is no slippage.
Braid on a Smooth Spool
Braid is slick and has no stretch, so on a smooth spool it can spin around the arbor. That is one of the main reasons anglers think a drag is broken. There are two fixes:
- Mono backing: Spool a base layer of mono first, then join the braid with a line-to-line knot such as the double uni.
- Electrical tape: Put a thin piece of tape over the line on the arbor to give the braid something to grab.
Backing also saves money, since you fill the spool partly with cheap mono instead of expensive braid.
Use the Correct Knot
On a braid-ready spool, a secure loop-based connection can help prevent slipping. At this point, you can apply the method using a union-style knot:
- Fold the braided line to create a loop.
- Use the tag end to form another loop alongside the main line.
- Wrap the tag around both sections and through the loop five or six times.
- Pull the tag end to form the knot.
- Place the resulting loop around the spool and wrap it four or five times.
- Pull the main line to tighten the connection securely.
For a smooth spool, first install approximately two meters of monofilament backing, then connect your braid using a suitable line-to-line knot.
Maintain Consistent Tension
Tension is one of the most important factors when installing braided line. Loose braid can dig into lower layers during a hard cast, creating frustrating tangles and wind knots.
This is the core of how to avoid common mistakes when spooling spinning reel with braid.
- Wet wipe: Fold a baby wipe over the braid and weave it between your fingers. You can grip harder without cutting your skin, and you can work alone.
- Wet rag: Pinch the line in a damp cloth about a foot above the reel.
- Rod placement: Grip the rod roughly four inches below the stripper guide, or rest the butt on your hip and crank with the other hand.
- Cardboard box and pencil: Poke the pencil through the filler spool inside a box so it spins steadily while you apply tension.
Work at a comfortable speed. Braided line can cut through a wipe and injure your fingers if you apply excessive pressure or reel too quickly.
To check tension, run a finger over the spooled line. It should feel firm, and you should not be able to dig into it. Wind at a steady pace, because going too fast can burn your fingers or slice through a wipe.
How to Spool Monofilament Line
Monofilament is generally easier to install because it grips the spool surface more effectively than braid.
- Attach the monofilament using an appropriate arbor knot.
- Close the bail arm after positioning the line correctly.
- Make sure the line passes underneath the line roller.
- Apply moderate tension using your fingers or a soft cloth.
- Wind the line onto the spool at a consistent pace.
When installing monofilament, pay particular attention to the direction the line comes off the supply spool. Incorrect orientation can introduce unnecessary line twist.
4. How to Spool a Spinning Reel Without Line Twist
Line twist is one of the most common spinning reel problems. It happens when the fishing line rotates unnecessarily as it transfers from the supply spool to your reel.
To learn how to spool a spinning reel without line twist, start with the direction the line leaves the filler spool. Here, the line should not be forced into extra twist as it goes on.
a. Match the Line Direction to the Bail Rotation
Don’t rely entirely on whether the label faces up or down. What matters is the direction the line comes off the supply spool compared with the direction your spinning reel’s bail rotates.
Position the supply spool so the line comes off in the same rotational direction as the bail is turning. This helps minimize unwanted twisting during installation.
For monofilament, it is to position the supply spool so the line comes off counterclockwise when viewed from the appropriate side. Always check how your particular reel rotates before winding.
b. Use a Wet Cloth for Better Control
A clean, damp cloth can help you maintain consistent tension while protecting your fingers from friction. Hold the line gently but firmly and crank the reel at a steady pace.
You can apply this technique to spool a spinning reel without line twist
- Match the bail: Orient the filler spool so line comes off in the same direction the bail turns, usually counterclockwise. Label up or down does not matter; the direction of travel does.
- Pull it straight off: Another angler lets the line peel straight off the spool, like filling a baitcaster, so the reel twists the line on and the cast twists it back out.
Test your setup. Watch the slack line between the filler spool and the rod. If it coils or twists, flip the filler spool over. Braid has no memory, so direction matters mostly for mono and fluorocarbon.
How to Fix Line Twist on Spinning Reel
If your line already has excessive twist, stop fishing and remove the twist before continuing. One simple approach is to pull several yards of line away from the reel with the terminal tackle removed, allowing the line to relax without a lure or hook attached.
Reel the line back under light, controlled tension. If the twist is severe, replacing the line may be the better option.
On the other side, the fastest way to fix line twist on a spinning reel is to strip the line out and respool it with the correct direction and tension. Mono tends to hold twist, so replace badly twisted line rather than fighting it. Overfilling also encourages twist, so keep that gap.
5. How Much Line to Put on a Spinning Reel
Overfilling your spinning reel is another common mistake. Too much line can escape from the spool during casting, producing tangles and wind knots.
On the other hand, underfilling reduces casting distance and leaves you with less usable line when fighting fish.
Find the Correct Fill Level
There are two practical measurements here:
-
- Fill the spool until the line reaches the end of the flat section, before the spool begins to curve.
- For a typical spinning reel, leave approximately 1/8 inch between the fishing line and the spool lip.
- Another approach is filling close to 1/16 inch below the spool edge.
- Too much line: The line balloons off the spool and tangles.
- Too little line: You lose casting distance as the line level drops.
The exact amount depends on your reel design and manufacturer’s recommendations. As a general rule, stop before the line reaches the curved outer edge of the spool.
Never continue winding simply to squeeze in more fishing line. A properly filled spool is more important than maximizing the amount of line installed.
Always check the printed capacity on the spool, and match line size to the reel. For bass and bluegill, one instructor prefers about 15 lb braid or 8 lb mono, because much heavier line overwhelms a small spinning reel.
6. Why a Spinning Reel Line Lays Uneven
If your fishing line gathers at the top or bottom of your spool, the problem may not be your spooling technique. It could be related to the spool’s position on the reel shaft.
Spinning reels use an oscillation system that moves the spool up and down as you turn the handle. This movement distributes fishing line across the spool.
Small adjustment washers, also called line lay washers or oscillation shims, control the spool’s position. Incorrect adjustment can cause line to accumulate unevenly.
How to Fix Uneven Line Lay on a Spinning Reel
If the line still stacks unevenly after careful spooling, the problem is mechanical. As the spool oscillates, shim washers under it control its height. Here is how to fix uneven line lay on a spinning reel.
- Remove the fishing line from the spool.
- Turn the drag knob counterclockwise until it comes off.
- Slide the spool off the reel shaft.
- Locate the adjustment washers or shims underneath the spool.
- Inspect how the fishing line was previously distributed.
- Make a small washer adjustment according to the line stacking pattern.
- Reinstall the spool and drag knob.
- Respool the reel and inspect the new line distribution.
Which Washer Adjustment Should You Make?
- Line stacking toward the top: Add a compatible washer to raise the spool.
- Line stacking toward the bottom: Remove a compatible washer to lower the spool.
Make small adjustments and test the result before changing anything else. Reel designs differ, so always consult the manufacturer’s instructions before removing internal components.
Keep the original adjustment washers that come with your reel. Washers from different manufacturers and models are not necessarily interchangeable. If yours are missing, contact the reel manufacturer for compatible replacements.
7. How to Avoid Common Mistakes When Spooling Spinning Reel with Braid
Even experienced anglers can make mistakes when installing braided fishing line. Fortunately, most problems are preventable with a few simple habits.
Common Mistakes to Avoid
- Spooling braid directly onto a smooth spool: Without suitable backing or a braid-ready connection, the line can slip around the arbor.
- Using insufficient tension: Loose braid can dig into itself and create casting problems.
- Overfilling the spool: Excessive line makes tangles and wind knots more likely.
- Ignoring line direction: Incorrect supply-spool orientation can introduce unnecessary twist, particularly with monofilament.
- Ignoring uneven line lay: Incorrect spool positioning can reduce casting performance and increase tangles.
- Reeling too quickly: Excessive speed can cause friction, damage the wipe, or injure your fingers.
How to Stop Wind Knots from Uneven Braided Line on Spinning Reels
Wind knots can result from several problems, including loose line, incorrect spool filling, and uneven line distribution.
To reduce their occurrence:
- Apply consistent tension when installing braid.
- Check that your spool distributes line evenly.
- Avoid filling beyond the recommended spool capacity.
- Close the bail manually after casting when practical.
- Keep loose line under control before retrieving.
These habits help prevent loose loops from forming and reduce the chances of frustrating tangles during fishing.
8. Best Line Spooler Tool for Spinning Reels
You don’t necessarily need an expensive tool to spool a spinning reel. A wet wipe, clean cloth, and a suitable way to hold your supply spool can work well for basic home spooling.
However, if you regularly change fishing lines or maintain multiple reels, a dedicated line spooler can make the process easier.
Portable Line Spooling Stations
Some portable spooling stations are designed for both spinning and baitcasting reels. Certain models include an attachment that holds the removable spinning reel spool, allowing line to transfer without the usual supply-spool rotation issues.
This can be particularly useful when working with monofilament, where controlling line twist is important.
DIY Spooling Setup
If you don’t have a dedicated tool, a cardboard box with a suitable opening can support a rotating supply spool. Alternatively, ask someone to hold the spool while you wind the line onto your reel.
Regardless of your setup, maintaining steady tension and checking line direction are more important than owning expensive equipment.
FAQs About Spooling a Spinning Reel
How do you put line on a spinning reel for beginners?
Open the bail, thread the line through the closest rod guide, attach it securely to the spool, and close the bail. Apply consistent tension while turning the reel handle. Stop before the line reaches the curved edge of the spool.
Should the fishing line spool face up or down?
Neither position is universally correct. The important factor is the direction the line comes off the supply spool compared with the direction the bail rotates. Check the line as you begin winding to minimize twist.
Can you put braided line directly on a spinning reel?
Yes, if your spool is braid-ready and you use an appropriate secure connection. If your spool has a smooth surface, use monofilament backing to prevent braid from slipping around the spool arbor.
Why does my spinning reel keep getting wind knots?
Wind knots can develop when line is wound loosely, the spool is overfilled, or the line distribution is uneven. Maintaining proper tension and checking your spool adjustment can help reduce these problems.
How do I know if my spinning reel has too much line?
If the fishing line reaches or extends beyond the spool lip, your reel may be overfilled. Leave a small gap between the line and the outer edge, following your reel manufacturer’s recommendations.
Can uneven line lay damage my spinning reel?
Uneven line lay does not necessarily mean your reel is damaged. Often, it can be corrected by adjusting the line lay washers. However, persistent problems may require inspection by a qualified reel technician.
What is the right way to spool a spinning reel?
Flip the bail, attach the line with a knot suited to its type, orient the filler spool so the line is not twisted going on, keep firm tension, and stop with a small gap below the spool lip.
Do I need mono backing for braid?
Only if the spool is smooth. Braid-ready spools with grooves or a rubber strip let you tie braid directly with a union knot.
Does the line label go up or down?
Neither is a rule. Focus on the direction the line leaves the filler spool, and watch for coiling in the slack line.
How full should I spool the reel?
Stop about 1/16 to 1/8 inch below the spool edge, at the end of the flat section.
Why does my line stack at the top or bottom of the spool?
The spool height is off. Add a washer for top stacking, or remove one for bottom stacking.
What can I use if I have no line spooler?
A wet wipe, damp rag, or cardboard box with a pencil gives you the tension you need.
Conclusion: Get Your Spinning Reel Ready for Better Fishing
Learning how to spool a spinning reel correctly is one of the most useful skills every angler should develop. The process becomes much easier when you understand how line direction, spool tension, line capacity, and adjustment washers work together.
Whether you’re installing braided line or monofilament, take your time and avoid rushing the process. Use the correct backing when necessary, maintain steady tension, and stop filling before reaching the spool’s outer edge.
Most importantly, inspect your line lay before and after spooling. If fishing line continues gathering at the top or bottom, check the adjustment washers instead of repeatedly changing your spooling technique.
Key Takeaways
-
- Always open the bail before attaching new fishing line.
- Match the supply-spool direction to your reel’s rotation to minimize line twist.
- Use monofilament backing on smooth spools when installing braid.
- Maintain consistent tension, especially when winding braided line.
- Leave a small gap between the fishing line and spool lip.
- Adjust compatible line lay washers to correct uneven line distribution.
- Inspect your reel regularly to prevent wind knots and casting problems.
- Check line lay before you respool.
- Use a union knot on braid-ready spools, and mono backing or tape on smooth ones.
- Control line direction to limit twist, and test it by watching the slack line.
- Keep firm tension with a wet wipe, rag, or spooler tool.
- Fill to the end of the flat section, leaving a 1/16 to 1/8 inch gap.
- Add or remove washers to fix stacking at the top or bottom.
Spooling is a small job with a big payoff. Prepare the reel, secure the line with the right knot, keep the line direction and tension under control, and stop at the proper fill level. If the line lay still looks wrong, adjust the washers. Follow these steps and you will cast farther and spend more time fishing than untangling.
Follow these steps and you’ll spend less time dealing with tangled fishing line and more time enjoying your next fishing trip.
